Guide:Quick Start Guide/Ship Overview
From STNE Wiki
STNE is a Strategy and Role Play Game. You can play here.
| Contents | STNE | Colonies | Buildings | Goods | Items | NPC | Ships | Stellar Cartography | Research | Trade | Combat | Settler | Alliances | Index |
|---|
This chapter of the Quick Start Guide will introduce ships, deuterium collection and trading at Federation Supply Stations (SUPs).
Contents |
Ship overview
First things first. Let's take a look at your ships. Go to the main menu, and click on "Ships" to go to the Ship Overview screen:
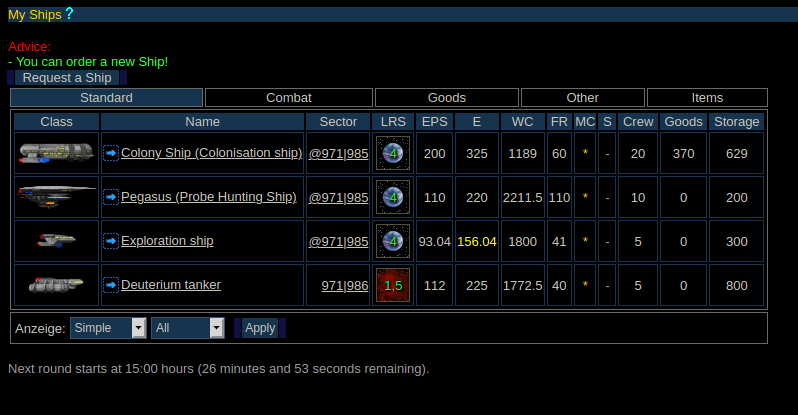
You start the game with two ships, a DY-500 class "Colonisation ship" and a Pegasus class "Probe Hunting Ship". As you level up you receive more ships and after following the previous chapters of this tutorial you should now be at level 5. Your ship list should now contain a Colony Ship, a Pegasus, an Exploration Ship and a Deuterium Tanker, you should also be able to request a second deuterium tanker from the federation.
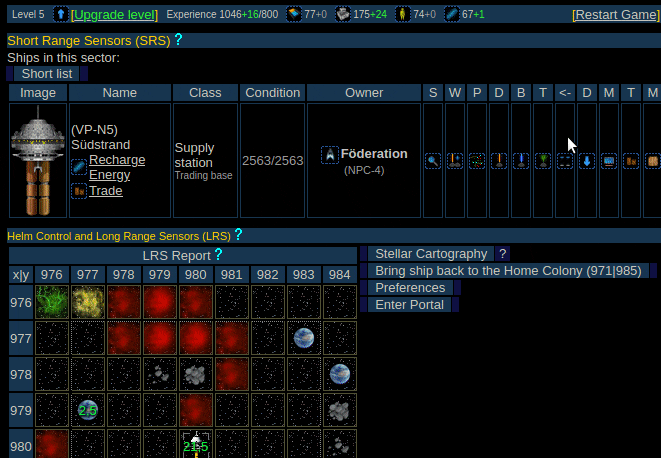
Your ship overview shows you where your ships are: in this example, the colony ship is in Sector @971|985. Your ships start in orbit of your home colony - the @ symbol in front of the coordinates signifies when the ship is in orbit. After the location, you can also see other key pieces of information about your ship. From left to right, these are:
- LRS View
An LRS view showing you the sector the ship is in - in this case it shows your home colony
- EPS
This is the amount of energy that can be used each tick - in this case 200
- Energy
This is the total amount of energy the ship currently has
- Warp core
How much fuel the ship has, some of this is used each tick to recharge the energy
- Flight Range
The amount of sectors the ship can travel each tick
- Main Computer
This shows whether the main computer of the ship is online, if the computer is offline the ship cannot be used. If the computer is online * is shown, if it is offline - is shown
- Shields
Shows whether the shields are online or not using the same symbols as the main computer
- Crew
Displays the amount of crew currently on board the ship
- Goods
Shows the quantity of goods currently stored on the ship
- Storage
Shows the quantity of free storage space on board the ship
A colony ship can carry up to 20 people, and it allows you create new colonies elsewhere, and 'beam' down goods and people to get them started. "Beaming" down is a well-known mode of transport used in the science-fiction series Star Trek, and it uses energy. Your colony ship can beam 20 goods or 4 crew per unit of energy, to and from the colony.
Remember that on every 'tick' ship crews and colony inhabitants consume food, and ships burn fuel. (Ticks occur at 12, 15, 18, 21 and 23:30 UK time). Every 5 crew on a ship, or inhabitants on a colony will eat 1 unit of food (rounded up - in this case, 12 crew will eat 3 food per tick). And the reactor on your Colony ship will use the fuel in the warp core at a rate of 1 fuel to 1 energy. A Colony ship's reactor can generate up to 60 energy per tick, and its solar cells can generate a small amount more if in orbit of a planet. Always make sure your ships and colonies have enough food and fuel aboard. If there is no fuel, the reactor will not generate energy. If there is no food, energy will be used to run the replicators (1 energy per food needed). But if the ship has no energy then the crew will abandon ship!
Ship Interface
Now, click on the small picture of your colony ship to load its interface, this has a number of parts:
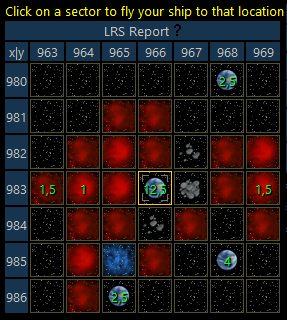
Long Range Sensors
This is a small map of the area around your ship with all the ship signatures that are detected shown. Generally this is also used for flying, simply click on the sector you wish to fly to and autopilot* will fly your ship there.
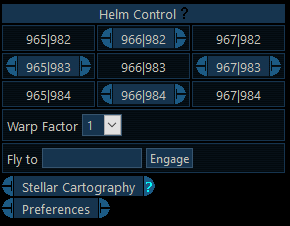
Helm Control
An alternative option for flying, helm control allows you to travel a set number of sectors in a straight line - the amount of sectors travelled can be changed by the warp factor drop down box. Helm control also features a "Fly To" box for feature pack users allowing them to enter a set of coordinates and the system will then fly to that location. Underneath helm control is a button for ship preferences - this allows things like renaming the ship or setting a ship message, and below this is the stellar cartography button which allows you to explore the map without needing to move your ship.

Ship Information
This row shows the general information about the ship, its hull strength, eps, energy, deflectors, flight range, position, crew and total efficiency.
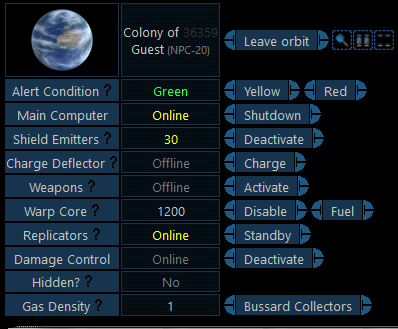
Ship Controls
This section shows information on the shields and warp core and allows control of things like raising the shields, changing the ships alert level and activating or deactivating the main computer.
* Autopilot is only available to feature pack users. When starting out all players recieve a trial of feature pack. To see when this expires click "My Account"
Collecting Deuterium
Since we need to trade for some duranium, first we need something to sell, for this we are going to collect some deuterium with one of our ships. Generally deuterium is collected with deuterium tankers, however any ship which has bussard collectors can collect some - in this example we used the Oberth class exploration ship, your DY-500 class colonisation ship would also work. Deuterium can only be collected in certain sectors, and different sectors will result in different amounts of deuterium.
| Sector | Deuterium Density |
|---|---|
 Open Space Open Space
| 1 |
 Standard Planet Standard Planet
| 1 |
 Moderate Planet Moderate Planet
| 1 |
 Water Planet Water Planet
| 1 |
 Desert Planet Desert Planet
| 3 |
 Sparse Deuterium Nebula Sparse Deuterium Nebula
| 3 |
 Dense Deuterium Nebula Dense Deuterium Nebula
| 5 |
As this table shows, the sector with the highest density of deuterium is the Dense Deuterium Nebula - generally, if possible, deuterium should be collected in these nebulae. Therefore to collect the deuterium we first need to find one of these and fly to it.
Luckily in the Beginners Zone there are a significant number of dense deuterium nebulae so finding one should be relatively easy, check the LRS of your ship and if you can see a dense deuterium nebula click on it to fly there. If you can't see a dense deuterium nebula click a couple of sectors away from your planet to fly there and your LRS should show some new sectors - one of these will probably be a deuterium nebula.
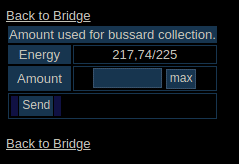
Now you've arrived at a nebula its time to collect deuterium. To do this click on the "Bussard Collectors" button on the gas density row of the ship controls:
![]()
A screen should then appear to ask how much energy you wish to use to collect the deuterium, in this case just click max and the ship will collect enough to fill its cargo hold.
Trading at SUPs
Now we want to trade some of the deuterium we've collected at a Federation Supply Station - these are commonly referred to as SUPs.
First we need to find our nearest supply station, these are visible in the ship LRS and in Stellar Cartography. On the map supply stations look like  or
or 
If you can see one of these in your ships LRS then fly to it. If you can't then you can either explore until you come across one or you can click "Stellar Cartography". This will open a new tab containing a larger map on which a supply station will be visible, your ship is located at the center of the map. Once you can see where it is close stellar cartography and fly your ship towards it.
Once you arrive at the SUP click "Dock", this will allow you to trade goods with the supply station without using energy. Alternatively you can click the dock symbol ( )
)
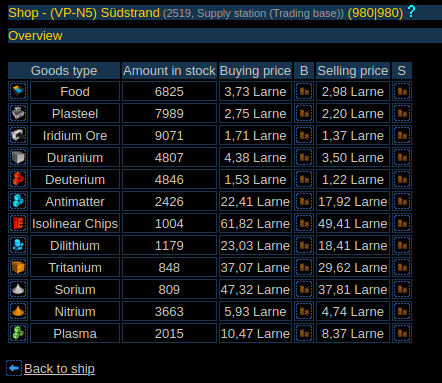
Once you've docked click the trade symbol ( ), this will open the trade overview, showing the prices the station will pay to buy your goods and charge to sell you goods. Prices are based on supply and demand depending on the stock level of the resource in the SUP. All Supply Station trades take place in Larne.
Now we want to sell the deuterium we've collected, to do this click the trade symbol next to the selling price on the deuterium row, then select the quantity to sell - in this case select all of the deuterium. You can also type the quantity you wish to sell in the input box before clicking providing amount.
Selling Deuterium is shown below:
Once you've sold the deuterium its now time to buy the duranium, click the trade button next to the buy price on the duranium row
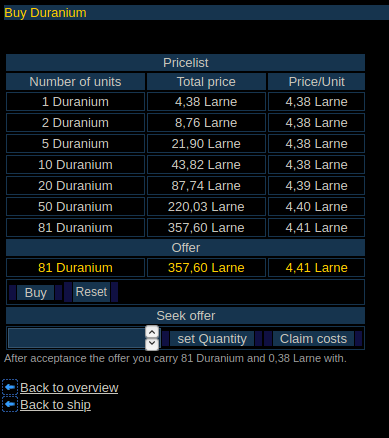
Select as much duranium as you can afford and then buy it.
Now we need to fly the duranium back to our colony. To do this we can either click "Bring ship back to Home Colony", if we do this the federation will tow the ship back to your home colony (this only works in the beginners area). Alternatively you can fly it back yourself, the green dashed line on the LRS should indicate the way back to your colony.
Beaming Goods
Now we've purchased some Duranium and returned to our home colony we need to beam it down to the colony so we can start constructing things with it.
To beam click  under the resource transfer section, this should be highlighted with a red box.
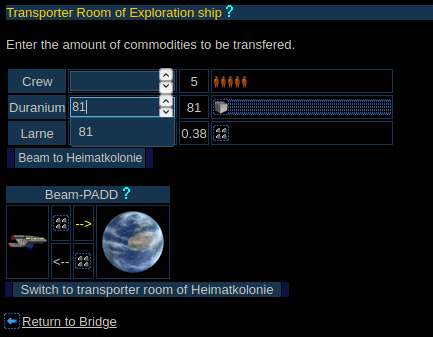
Then input the amount of the resources to beam down (in this case all of them) and click "Beam to Home Colony".
Now the duranium is on the planet and you should be able to continue building. We will cover this in the next chapter.
Continue to Preparing to Advance to Level 6
Return to Quick Start Guide Overview